Pages

Sunday, December 4, 2011

Enter the 2012 Hoffman Challenge!


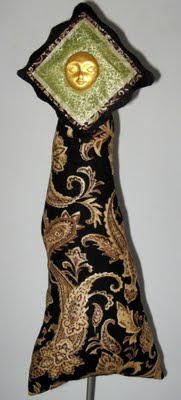
The fabrics for the 2012 challenge have been announced; and, they capture all the old time romance you may find during beautiful Spring walks with fancy umbrellas or on hot Summer picnic days.

I have to admit I haven't entered these past two years; although, I had every intention to do so.  I'm already starting to prepare now to make sure I have enough time to get everything finished.  I strongly suggest you give it a try, if you haven't already.  What I love about this challenge is it gives everyone the opportunity to have their work exhibit in a traveling show, which is exciting - nationally or internationally. 

A couple of things to remember if you enter:
  • Your work cannot be delicately made because it will be traveling with everyone else's dolls.  The dolls are packaged in a few big bins; but, there is really no room to give special treatment to any one of them. 
  • The stand needs to be strong.  Use a really strong dowel because you don't want it to snap. I've heard many people have had a lot of success with this...Otherwise, try break line from an auto parts store. It's a strong, but very light, piece of metal that comes in different diameters, just like the dowels. You'll need something to cut it down to size.  There is a bolt (male end) at one end of the break line which gets inserted into the 7" wooden base.  You'll  need to drill a larger hole through so you can insert a lock nut (female end) at the bottom and attach the two.  Put a lock nut in the bottom of the wooden base. Then, screw the two together. 
  • Label your doll with your name and address on the bottom of the base so they know who to send it back to and make sure you include the check for return s/h. I always forget this step and have to reopen the box again right before it gets shipped.
  • There are other rules you can read, not too many, by going to their site; but, these are the ones that really stand out in my mind. I have a "Challenges" tab at the top of this blog that you can refer to for easy reference any time. 
Here is a picture of all the fabrics in this year's collection.  The one above is the main fabric that needs to be used for the challenge.  You can buy these fabrics at Quilt Kits Online.  Type in "Hoffman 2012 Challenge" in their search bar.  Hope to see your entries!

Lavender - J8671 70


Lavender - J8672 70


Lavender - J8673 70


Lavender - J8674 70


Lavender - J8675 70


Lavender Pearl - J9000 70P


White Pearl - J9000 3P


Pink Pearl - J9000 12P

Sand Pearl - J9000 62P


Purple Pearl - J9000 14P


Monday, September 5, 2011

Pattern Making: Part 2: Finding Your Face and Putting It Together

 
Photo by Gloria von Gesslein
aka Mrs. Art Doll Maker
Hoffman background fabric hand painted ocean woodland teal between golden scrolls
Additional details - see picture below


Okay, I'm really behind schedule...BUT!...I didn't forget!  Sometimes you just need to step back and focus on other things before you return to what you were doing before.  My sincere apologies.

So, this post will pick up where we left off from Pattern Making: Part 1 - Creating Outlandish Figures:

  • Sew and stuff the soon-to-be-but-I-really-don't-know-what-it-is-yet creature
  • Finding your face - a very easy technique
  • Pics of other WIPs developed from this technique, which is my all-time favorite way of making art dolls
Ready?  Here we go!


All art dolls range from 8" - 20" in height.


Photo by Gloria von Gesslein
aka Mrs. Art Doll Maker
Hoffman fabric enhanced with embellishments
Face - hand painted clay face from push mold
Hair - attached feathers


Photo by Gloria von Gesslein
aka Mrs. Art Doll Maker
Hoffman fabric


Photo by Gloria von Gesslein
aka Mrs. Art Doll Maker
Hoffman background fabric hand painted black between golden scrolls
Face - hand painted clay face from push mold
and Hoffman remant fabrics using fabric stiffener


Photo by Gloria von Gesslein
aka Mrs. Art Doll Maker
Hoffman background fabric hand painted candy purple between golden scrolls


Photo by Gloria von Gesslein
aka Mrs. Art Doll Maker
Hoffman background fabric hand painted yellow between golden scrolls
Face - hand painted and gessoed


Photo by Gloria von Gesslein
aka Mrs. Art Doll Maker
Wrond side of Hoffman fabric used for body
Face - hand painted and gessoed


Photo by Gloria von Gesslein
aka Mrs. Art Doll Maker
Wrong side of Hoffman fabric used for face
and
Right side of same fabric used for body


Photo by Gloria von Gesslein
aka Mrs. Art Doll Maker
info same as above picture


Photo by Gloria von Gesslein
aka Mrs. Art Doll Maker
Hoffman fabric enhanced with embellishments
Face - hand painted clay face from a push mold
Hair - attached feathers


Photo by Gloria von Gesslein
aka Mrs. Art Doll Maker
Hoffman background fabric hand painted candy purple between golden scrolls
Face - Remants of Hoffman fabric, both right and wrong sides used
with 2 crystal button eyes


Photo by Gloria von Gesslein
aka Mrs. Art Doll Maker
Hoffman background fabric hand painted candy fuschia pink
and lime grasshopper mint green between golden scrolls
Handpainted and gessoed face


Photo by Gloria von Gesslein
aka Mrs. Art Doll Maker
Hoffman background fabric hand painted ocean woodland teal between golden scrolls
Handpainted face with attached human false eyelashes
Arms, legs, tail - Additional Hoffman fabric remnants


Photo by Gloria von Gesslein
aka Mrs. Art Doll Maker
Hoffman background fabric hand painted bright azul liquid sky blue between golden scrolls
Vintage pearls with 1 handpainted gold
Face gessoed and hand painted


Saturday, June 18, 2011

Announcement: Moving Craft Blogs Over to Sweet Emergencies Gallery


Just so you know, I'm moving the crafting blogs and ideas over to my other blog, Sweet Emergencies Gallery.  I've been finding more art doll blogs that I wanted to share here, on Mrs. Art Doll Maker, but needed to make more room for them.  So when you don't see them here, check on the other site. 

Sunday, June 5, 2011

Pattern Making: Creating Outlandish Figures

Photo by Glo von Gesslein


This is my favorite way of designing patterns, which I have done for many years and have found to be very successful.  Little did I realize at the time, it was very avante-garde.  My self-esteem felt knocked as I couldn't seem to really "fit in" with how patterns were normally made.  Some experienced artists weren't as supportive as I would have liked them to be and corrected my approach many times.  Thinking and trusting that they knew better because of their achievements, I discarded my "natural" way of doing things to follow their "correct" way.  In light of this, I didn't have enough self-confidence as an artist to listen to my own voice and follow my own path, which you really must do as an artist, at all levels. 

At the time when I first started, I didn't know anyone who was making patterns this way.  Everyone was making dolls or art dolls the "traditional" way, of drawing all the body parts that actually looked like what they were supposed to.  Although I gave it my best effort, they never came out the way I wanted them to.  The "traditional" way always felt very restrictive and confining to me.  I prefer freedom, loose lines, off settings, things that didn't look "quite right" but worked never-the-less. 

This is a method I discovered after many failed attempts at trying the "traditional" methods of pattern making.

First, get a big sketch pad, as big as you want.  Mine is half my body size because I like working on a large scale.

Take a big black marker and close your eyes.  Scribble all over the page like this.


Photo by Glo von Gesslein


Place the drawing on the floor and take a look at it.  Do you see any images that "pop" out at you?  It doesn't matter what shapes they are.  It just has to catch your attention. 

Walk around to the side.  Look at it again.  Do you see anything images that seem to come forth, almost rising from the rest of the lines?

Walk around to the third side. Do the same thing again.  Just let your eyes relax and look for more images.

Once again, do it for the 4th side.

Decide what image or images you want to "lift" and "sculpt" out from one of the 4 sides.

I decided to go with the 4th side which you can see in the picture above.

 
When you know what you want, take a highlighter, crayon, or colored marker and section out your body pieces.


Photo by Glo von Gesslein


Since I wasn't sure if I wanted to use these additional sections as arms or hands, I highlighted them in blue anyway and will see how they play out later on as this piece is being put together.


Photo by Glo von Gesslein

 
Cut out your sections.  Now, you have the pattern for your art doll.


Photo by Glo von Gesslein


Lesson Learned:  Follow your own inner voice.  You may be the avante-garde of your time.  Like Mom said, "listen to someone's advice.  Then, make your own decision. " Their way isn't your way, which is why you weren't joined at the hip.  You were given different bodies to travel through this life on different paths.  Find your path and take it.  Their way is not necessarily the right way for you; but, certainly may be the right way for them and vice versa.

Next week: 
  1. These pieces will be sewn and stuffed, ready to begin the designing stage, which is really the most fun.  
  2. I'll also show you the easiest way of finding your face, even if you have all these shapes cut out that don't seem to make any sense. 
  3. If I can get all the pics taken, I'll share pics of a new series I've been working on for quite some time using this form of pattern making.  You'll see the basic scribble shapes come alive in the patterns, colors and techniques you choose as an artist. 

Sunday, May 22, 2011

New Art Doll: Rosanna - Doll of Love and Following Your Dreams

Rosanna
13" x 5"
Art Doll and Photo by Glo von Gesslein


Rosanna was created mostly from an Icon Doll class and kit I purchased a few years ago by Art Alchemy Studio.   This kit was the second one purchased and was safely stored away all this time until I had a hunger to pull it out.  She was created in a couple of days because I had a strong, clear vision for how I wanted her to come out.

When I first saw the kit, the colors and textures immediately reminded me of "love". 

After Rosanna was completed, there was something about her that reminded me of the Italian Renaissance.  There is a gracious warmth about her, as well.

She sat before me.  We stared at each other for the longest time, deciding what name to bestow on her.  Since I couldn't think of anything that was befitting, I asked her.  "Rosanna" immediately came to mind. Later, I found out its meaning is "Rose" or "Gracious Rose".

Here are some close up shots of her. My apologizes for the one that came out blurry.  This is the best one I could get.  Think it's time for a new digital camera, too.


Close Up of Rosanna
13" x 5"
Art Doll and Photo by Glo von Gesslein

Here she holds a small painting of the Mona Lisa.  The painting can be found in the Memory Making aisles of craft stores. 


Close Up of Rosanna
13" x 5"
Art Doll and Photo by Glo von Gesslein

A velvet leaf and two silver charms titled, "Love" and "Follow Your Heart" adorn her bodice. 


Close Up of Rosanna
13" x 5"
Art Doll and Photo by Glo von Gesslein

She holds 2 staffs that were created from the plastic shoe inserts of new shoes.  I cut them down to size with regular scissors and wrapped beaded trim around them, using a glue gun to secure them together at the top and bottom.  Her arms are brass chains that hold onto the staff and wrap around her body.


Close Up of Rosanna
13" x 5"
Art Doll and Photo by Glo von Gesslein

A close up shot of the Mona Lisa and a little heart placed in the general area where it would normally be found.  The Mona Lisa adds a bit of mystery, which I see in her, as well. 

Next week: Pattern Designing and Coming Up with Outlandish Figures

* Name meaning derived from Baby Names and Baby Names World.

Sunday, May 15, 2011

New Icicle Doll Series: Tropical Beauties and Paradise Pooch

Carmel (meaning: Woodland)
Tropical Beauty 1
8"x 5"
by Glo von Gesslein


This series started out from an Icicle Doll pattern that I embellished from Christmas ornaments I was making. I completely changed direction and turned them into a summer series.  Although I don't have the original template, you can refer to this pattern from Bel's Nook because it is very similar to what I used. Just adjust the size to your preference.

  • I used craft felt to make the doll body and whipped stitched around it.
  • Mini fur boas or fibers were wrapped around the body and adhered with glue.
  • The face was made from a push mold using air dry paper clay and painted.
  • Several flower bouquets for 0.99 cents were purchased from Michaels.  The mini flowers were snipped individually and in bunches.  Then, attached to the doll.
  • Feathers and blue flower ribbon trim were added as adornments in some instances.


Alani (meaning: Orange Tree)
Tropical Beauty 2
8" x 5.5" at head x 2.5" at base
by Glo von Gesslein


Here are some other examples of the variety of Icicle Dolls made by other artists:


Aolani (meaning: Heavenly Cloud)
Tropical Beauty 3
8" x 4" at head x 3" at base
by Glo von Gesslein


Mei (meaning: Great)
Tropical Beauty 4
8" x 5" at head x 4" at base
by Glo von Gesslein


Wainani (meaning: Beautiful Water)
Tropical Beauty 5
8" x 4" at head x 3" at base
by Glo von Gesslein


LeiLani (meaning: Heavenly Flower)
Paradise Pooch
9" x 4" at left x 3" center x 5" by right
by Glo von Gesslein


Paradise Pooch originated as butterfly wings for Meadow Sundancer that didn't turn out well.  It really is a compilation of layers and layers of failed attempts at trying a bunch of different techniques. In the end, I just played and wanted to use up some supplies to see what I would come up with. 


Close up of Paradise Pooch: LeiLani
by Glo von Gesslein
  • What you see is a blend of orange and yellow sponge painting with lots of dabs of gold Pearlx Powder.
  • Faux flowers were adhered with E6000 glue all over the body. (However, I wouldn't recommend that step since E6000 has been shown to cause cancer. Use a glue gun instead.  I discovered this after getting severe headaches and having eye problems. Then, I read the back of the label. It said it right there. It didn't help working outside with it. After I stopped using it, these side effects went away. I'm more cautious with what I use now.)
  • Two very large googly eyes with eyelids made from felt and false human eye lashes were attached at the ends.
I would like to add on a tiara to her little head but haven't been able to find one yet. I might also add some touches of paint to the eyelids with crystal rhinestones; but, we'll have to see how it looks first.


Back of Paradise Pooch: LeiLani

by Glo von Gesslein


* All Hawaiian names have been chosen from Buzzle.com and Our Baby Names.


Next Week: New art doll entitled Rosanna. A doll about love and following your dreams

Sunday, May 8, 2011

Happy Mother's Day!

Created by Glo von Gesslein
12" x 12"


Okay, a little late in the day; but, I wanted to wish everyone a very Happy Mom's Day. 

This is a bouquet I put together for my Mom-in-law.  I laid out a selection of different ideas and had my husband choose what he liked for her.  Everything was bought at Michaels. 

Materials:
1. Ceramic cup attached to plate
2. (2) bouquet of flowers
3. Trim around cup
4. Small green styrofoam cone
5. Lots of double sided taped wrapped around the inside and on bottom of inside cup to secure bouquet

Steps:
  1. I rounded the green cone off on the bottom edges with scissors until it fit better inside the cup.
  2. Then, I cut it down to size so it peeked out a few inches above the cup. 
  3. I cut each of the flower stems off from the bouquet with wire cutters and stuck them into the cone. 
  4. I made double sided tape and secured the cone to the inside of the cup so its more secure.  This way, she can always remove the flowers if she wants to and use the cup for something else.
  5. Lastly, I used E6000 to adhere the trim around the top edge of the cup.
Next week's post: 
My new series of dolls called Tropical Beauties and Paradise Pooch.

Wednesday, April 13, 2011

Tutorial: Fairy Art Schools


What fun! Take a look! The ideas of endless! I'm picturing rainforests, galaxies, deep ocean realms, tall grass retreats...All scenes I wanted to do in a shadow box, cigar box, jar, birdhouse, fish tank, a box I built myself, anyplace I could create a little inner world. 

I first came along this tutorial via A Magical Whimsy.  She recently started her blog and shared this tutorial with us.  I like it because it shows how to create that slanted roof, which is very easy to do, and gave me a few other pointers along the way that I didn't think of.  Thank you!

Sunday, April 10, 2011

1,000,000 eArtists on 1 Canvas


I came across this site today called, "MONA - Museum of Neverending Art".   It's a place where you can create your own piece or add to someone else's work, right there at your own PC.  It looked like it could be fun or interesting nevertheless.  After a few seconds, I already created something light-hearted and fun...something that reminded me of Spring-filled days at a picnic while flying kites.   Before I could share what I did, I must have accidentally closed out the tab because my session ended. 

You can click on the link though to see it and begin your session in a different place or add to anyone else's piece:

happiness by me

Once the picture comes up, if you click on the minus sign in the upper left hand corner, you'll begin to see all the works of art added by everyone around the galaxy.

Sunday, April 3, 2011

Letting Go


Juliette Crane is my favorite artist; and, I’m so honored to be taking an online class with her, "How To Paint an Owl".  Her work is very inspiring; and, for some reason, these owl paintings speak to me on a very deep level.

The major lesson I picked up from last week was about letting go. Our first assignment had to do with creating backgrounds for our canvasses.  I can’t tell you how difficult I found it to just let go and get lost in the creative process. I feared messing up. I feared ruining what I made already. I feared doing it wrong, although I wasn’t exactly sure what I was doing all the long. This is no reflection to Juliette’s teaching skills but something I realized I dealt with quite often as an artist, which is very stifling because if you're bound by this fear, there is no progression in your work. If you’re afraid to proceed, you might end up staying put where you are when you should step out and take that risk.

Big deal! We screw up. It doesn’t come out right. We mess something up. Go back and cover it up…with paint, cloth, fiber threads or whatever medium you’re using. It doesn’t matter. You can keep going over that same surface time and time and time again, which I did, until you get to a point that you’re happy with the results or you feel its right.

She strongly recommends listening to your intuition and relying on what feels right to you. Use what you’re drawn to. You don’t have to understand why. In the end, it will all work out and on some level, it will make sense.

There is no such thing as a mess up.  Remember, mess ups are only new gateways to paths yet to be discovered. Take a deep breath, let go and enjoy the journey of the creative process.  No thinking allowed. As Nike says, “Just do it”. It’s okay. You can’t go wrong.

After thought posted later that evening:
Regarding art dolls, if you don't want to redo an actual surface by painting it, tear off anything you can or add something on top of it.  For example, in the post below, Meadow Sundancer, I kept removing all of the embellishments and outfits several times and reattached new ones. She was completely redone more than several times over a course of a couple of months. 

Sunday, March 27, 2011

New Doll: Meadow Sundancer

8" Art Doll and Photo by Gloria von Gesslein


Meadow Sundancer

Loves sunbathing and dancing in the fields where wildflowers and poppies grow.
She's a light-hearted, carefree spirit who brings peace and harmony wherever she goes.
 She loves laughing and is only seen when bees swarm and the crickets chirp.
She likes sitting on the edge of leaf boats and dipping her toes into soft flowing creeks.
She wears a skirt made from lavender petals and iridescent pale pink wings.
With each flutter, waves of love are spread across the meadows
And new butterflies take flight to continue spreading The Song of Meadow Sundancer.

The doll's name and description were created by entering key words that defined this piece into The Fairy Name Generator.  Then, changes to the generated name and description were made to fit what I felt this piece expressed.


8" Art Doll and Photo by Gloria von Gesslein


Meadow Sundancer was created for my swap partner, Marti Kinkor, in one of the art doll clubs I belong to, Glitter Town Dollys.  This was not the original design.  I went through more than several versions.  The final piece is vastly different from what I originally had intended but am much more pleased with how she turned out.


8" Art Doll and Photo by Gloria von Gesslein


Interpretation of pattern by The Bird House - Butterfly Belle - Free Pattern
Instructions to Butterfly Belle

Wings: Store bought butterfly from Michaels.  Wings and antennas were removed and reattached to doll.

Purple skirt and headpiece: Store bought flower from Michaels.  Petals and flower head were taken apart.  Then, reattached to the doll.

Crown:  Handcrafted paper flowers and pearl bracelet toggle from Michaels.

Face: Handpainted with acrylics, colored pencils, blush

Embellishments: baby butterflies, fiber wrapped wire (hand-done), crystals